本篇是消融Shader特效讲解的第二篇,主要是对Shader代码实现的讲解。
本次使用的项目场景、模型和贴图等资源还是继续沿用上一篇的,这里不再累述。
下面进入正式的代码讲解。
属性变量
Shader "Custom/Dissolve Shader"{
    Properties
    {
	_NoiseTex("Noise", 2D) = "white"{} //Noise贴图	_RampTex("Ramp", 2D) = "black"{} //渐变贴图	_Dissolve("Dissolve", Range(0, 1)) = 0 //消融程度	_Emission("Emission", float) = 1 //自发光强度
        _MainTex("Albedo", 2D) = "white"{}
	_Specular("Specular", 2D) = "black"{}
	_Normal("Normal", 2D) = "bump"{}
	_AO("AO", 2D) = "white"{}
    }
开放变量,包括Noise贴图、渐变贴图、消融程度、自发光强度,以及PBR Specular工作流所需要的贴图。
基本跟上一篇所开放的变量保持一致,唯一不同的是没有开放Clip变量。我们后边会在Shader里把它设为0.5。
设置渲染标签
SubShader{
    Tags
	{
	    "RenderType"="Opaque"
	    "Queue" = "AlphaTest"
	}

    LOD 200
因为模型并没有透明,所以渲染类型是Opaque。
而我们要通过剔除渲染的方式实现消融,所以把它的渲染队列放在AlphaTest里
声明变量
CGPROGRAM// Physically based Standard lighting model, and enable shadows on all light types#pragma surface surf StandardSpecular  addshadow fullforwardshadows// Use shader model 3.0 target, to get nicer looking lighting#pragma target 3.0sampler2D _NoiseTex;sampler2D _RampTex;fixed _Dissolve;float _Emission;sampler2D _MainTex;sampler2D _Specular;sampler2D _Normal;sampler2D _AO;struct Input{
    float2 uv_MainTex;
    float2 uv_NoiseTex;};// Add instancing support for this shader. You need to check 'Enable Instancing' on materials that use the shader.// See https://docs.unity3d.com/Manual/GPUInstancing.html for more information about instancing.// #pragma instancing_options assumeuniformscalingUNITY_INSTANCING_BUFFER_START(Props)// put more per-instance properties hereUNITY_INSTANCING_BUFFER_END(Props)
因为使用的是Specular工作流,所以我们选择表面着色器。
addshadow可以使AlphaTest的模型产生正确投影,fullforwardshadows可以使shader支持所有的灯光。
接下来就是在CG里对所有的变量进行重新声明,然后定义输入结构体。
后两句Props是Unity新版本Shader自动添加的代码,这里可以将其忽视。
表面函数
 void surf (Input IN, inout SurfaceOutputStandardSpecular o)
        {
	    fixed Noise = tex2D(_NoiseTex, IN.uv_NoiseTex).r;
	    fixed dissolve = _Dissolve * 2 - 1; //将范围从[0,1]重新映射为[-1,1]	    clip(Noise - dissolve - 0.5); //Alpha Test函数,结果小于0的像素会被剔除
	    fixed border = 1 - saturate(saturate(((Noise - dissolve)) * 8 - 4)); //将计算结果的范围重新映射到[-4,4],裁切到[0,1]然后反相	    o.Emission = tex2D(_RampTex, fixed2(border, 0.5)) * _Emission; //自发光
            fixed4 c = tex2D (_MainTex, IN.uv_MainTex);
            o.Albedo = c.rgb; //漫反射
	    fixed4 specular = tex2D(_Specular, IN.uv_MainTex);

            o.Specular = specular.rgb; //高光            o.Smoothness = specular.a; //光泽度
	    o.Normal = UnpackNormal(tex2D(_Normal, IN.uv_MainTex)); //法线
	    o.Occlusion = tex2D(_AO, IN.uv_MainTex); //AO        }
        ENDCG
    }
    FallBack "Diffuse"}
接下来最重要的就是shader的表面函数部分了,算法逻辑在第一篇一已经讲过了,这里不再累述。
而clip函数里之所以最后减掉0.5,是因为在第一篇的时候我们说过,Amplify Shader Editor默认的AlphaTest是0.5。所以为了保证效果一致,我们在这里减掉0.5。
将表面函数的结构体输出之后,最后就是回滚语句。
最终效果
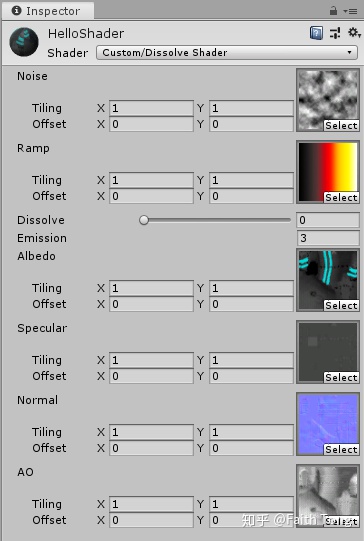
材质面板
编译完成之后,可以看到最终的效果跟上一篇的效果一模一样,消融特效的Shader制作完成。


